|
Design with Boxes
For this tutorial you will require the following plugin:
Harry's Filters: Here
Install this filter in your PSP "Plugins" folder.
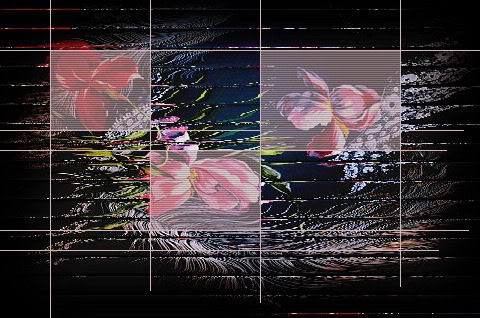
Image featured in this tutorial

(right click; select Save Picture As), or use your image of choice.
1. Choose an image and open it  in PSP. in PSP.
2. Hold down the Shift key and press D. This will create a copy of the image. For the time being, keep both images open on the screen. Save the copy as Boxes.psp.
3. Apply Harry's Filters "Glass Blinds" or "Glass Tiles" using the following settings:
Tile Height = 0
Tile Width = 27
Reflection = 240
4. Add a layer  and call it Fills. This layer will be used later in the tutorial. and call it Fills. This layer will be used later in the tutorial.
5. Add another layer and call it Lines.
6. Using the Dropper tool  , choose a
Foreground color from within the image itself. This tutorial uses RGB 213/182/185 (HTML #D5B6BD). , choose a
Foreground color from within the image itself. This tutorial uses RGB 213/182/185 (HTML #D5B6BD).
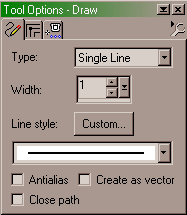
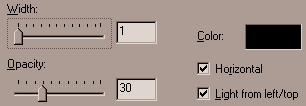
7. Select the Draw tool  and apply the following settings: and apply the following settings:
8. Ensure that the Rulers are visible around your image. If not, click View > Rulers.
9. Hold down the SHIFT key and draw a vertical line, starting at co-ordinates 50, 0. (Holding the SHIFT key down keeps the line straight, no matter how much the mouse may stray.) You can see the co-ordinates in the lower left of the screen - the figures change as the mouse moves:


Draw the line down to the bottom of the image and release the mouse. Draw your next line at co-ordinates 150, 0, but this time do not go all the way to the bottom. Make the line shorter. Continue drawing vertical lines from the following co-ordinates, and vary the length of each line so that they are not uniform:
260, 0
400, 0
Remember to hold down the SHIFT key before drawing each line. Now, using the same method, draw horizontal lines from the following co-ordinates - remember to vary the length of each line:
0, 50
0, 130
0, 150
0, 230
0, 250
10. Using the Magic Wand  tool, while holding down the SHIFT key, select four of the boxes formed by your lines. Choose any four you wish, but it is more effective to select boxes that will highlight the main features of your image. In the image used for this tutorial, the three large flowers should be highlighted. You can select more boxes if you wish, but don't overdo. tool, while holding down the SHIFT key, select four of the boxes formed by your lines. Choose any four you wish, but it is more effective to select boxes that will highlight the main features of your image. In the image used for this tutorial, the three large flowers should be highlighted. You can select more boxes if you wish, but don't overdo.
11. Select the Flood Fill  tool and apply the following settings: tool and apply the following settings:
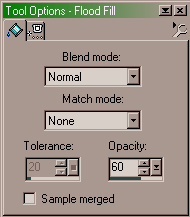
Using the same foreground color you used to draw the lines, Flood Fill one of the boxes. If you also held down the SHIFT key, all four boxes will fill at the same time.
12. Click Effects > Texture Effects > Blinds and apply the following settings:
The Color of your blinds should be black.
13. Right-click to deselect the boxes.
14. The next step is to place an unaltered copy of your image underneath the Lines layer. To do so, go back to the original image and click Copy. Now, select your Boxes.psp image again and activate the empty layer called Fills. Hold down the CONTROL key and press E to place a copy of the image onto this layer.
Use the Mover tool  to centre the image correctly. to centre the image correctly.
15. Using the Selection tool  begin selecting and deleting the areas of this image which are outside the boxes. Use the lines you have drawn as a guide to select areas of the image, and press the Delete key. The image underneath will then show through: begin selecting and deleting the areas of this image which are outside the boxes. Use the lines you have drawn as a guide to select areas of the image, and press the Delete key. The image underneath will then show through:
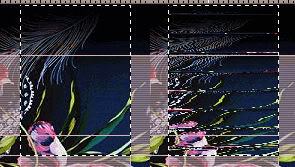
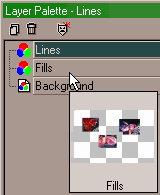
Use the Layer Palette (shown below) as a guide, or make the background layer invisible so that you can see the Fills layer. This will help ensure that you don't miss any areas:
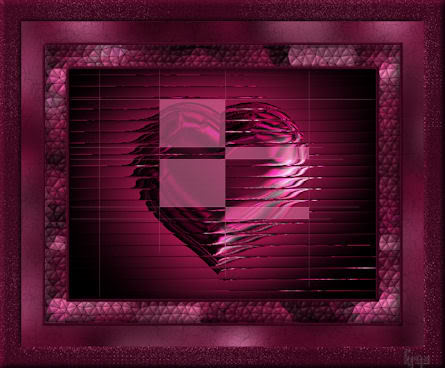
16. Once you have completed this, your image is finished. The main features of your image should appear highlighted by the boxes.
Render all layers visible (if any were invisible) and add a border or frame, or slice the image into a header for a web page, adding text if you wish.
SEND YOUR RESULTS TO THE GROUP WITH A COPY TO YOUR INSTRUCTOR; BE SURE TO INDICATE THE NAME OF THE OF THE CHALLENGE Please do not copy, tear apart, email or share these lessons without my permission: Thank You for your understanding and respect for the hard work that goes into these lessons.
Graphics/Content ? 2006-2021 Queen Krissy New-Bee's. All Rights Reserved.
Text and graphics ? Web sets by Ladyoz. All rights reserved.
|