Google Translate

Your First Name Tag

This tutorial written in PSP 9 and can also be used in any newer versions as well.

Written and Copyright ©Krissy 2009 This is my own creation, any similarities to other tutorials is purely coincidental and unintentional.


Understanding Layers and tubes


Drag the Arrow to mark your progress


Good luck and have fun!


DOWNLOAD SUPPLIES HERE:


In this lesson we will learn how to work with a layers pallet and make your very first Name Tag.


First before saving the images that I have provided go to your "My PSPFolder/Babybees/Challenge" file and create a new file and name it nametag, this way you will know were to save the images.


I have made your images for you that we will use in this lesson.  Click on each picture and it will prompt you to save it.  Save it to your C Drive under the folder that you just made from above.


Your save file will look like this:


Open up your PSP and click on file/open.


When it opens use the arrow next to "look in" and find your "My Picture" file then look for the folder we just created called "nametag".


Double click on the image and it will open up in psp.

You should now have both the tag image and the zebra bee opened up in your PSP.

Now go to file and click on new:


When the box comes up we will be making a "new image" at these settings 500 x 500.  Look at my example for all the other settings.

This is what your project starts out to look like, in most cases your canvas as I call it is blank, Notice the Materials it is actually called the Materials layer and that is were you will find your colors, gradients and patterns.  The Layers pallet is simply that, it shows each layer that your working on in the box.  We will go through renaming them so that its easier to find the layer that you want during your project.

Your 2 images should still be opened up in your PSP click on the blank tag so that is visible, right click on it and click copy.


Now go to your blank canvas right click on it and click "Paste As New Layer".


It will paste it in the center of your canvas.  Notice your layers you should now have 2 rasters and they will look like this:


This is a very important part of the lessons:


Many people do not understand the importance of the layers.  As the name implies it is the actual layers of your work, its like building a house.  Your first layer is your basement, then the first floor then maybe a second floor but each are layered on top of each other.  The same applies here each image that you work with will place on top of the other one hence they are layered images.  Renaming each layer helps your find them later.  So lets try and do this now with the 2 raster layers that we have.


On "Raster Layer 1" click on the name it will highlight blue this is called activating that layer.  Now with that layer activated right click on it and click on rename.

See Examples:


Rename "Raster 1"  bk.  bk for me stands for the background of the tag were working on.  Your layers look like this now:

See Example:


Now click on the word "Raster 2" to activate it right click once it is activate it and rename it tag.  With that done my layers now look like this:


Now lets add our goofy looking bee zebra.  Like above go the zebra that is still on your PSP right click on him or her and click copy like so:


Go back to your canvas with the tag in it and as above right click on it and paste it as a new Layer  like so:


You will now see that your zebra is over your tag.  OMG that doesn't look right!!!  Not to fear that's the point of the layers unlike your house layers these layers you can move around.  And with these layers you can actually put the basement on top of the 2nd floor.  HAHAHAHA :


Okay were done panicking lets first rename the new layer.  Like above activate the "Raster 1" layer by clicking on the name and making it blue, then right click on it and rename it zebra.  Mine now looks like this :

See Example:


Indulge me for a moment and lets play with the layers.  Making sure that your Zebra layer is activated (which it will be blue) with your mouse button left click and hold the mouse and drag the word Zebra down below the word tag let go once its there.:

See Example:


This is what it looks like now: 

Congrats you have successfully learned how to move your layers.

But we don't want it that way so you can either drag Zebra back above the word tag Or you can make your life easy and click on the redo button.  What's that button.  Well look at the picture its the one one the top of your PSP.

See Example:


Your project now went back to its original look.  The redo button is an awesome button if you make a mistake don't forget its there.:

Lets move our Zebra he looks like he needs to be somewhere else.

To do this were going to learn yet another great tool and one of my favorites its the "raster deform tool"  its located on the far left side of your PSP and looks like this:

See Example:


Now with your Zebra layer activated click on the "raster deform tool" like the picture above.  Notice on the zebra that there is a box that is around it with what is called nodules on all four sides and in the center on all four sides as well.  The deform tool will not only allow your to move the image but by grabbing a nodule and either moving it in or up you can resize that image as well.
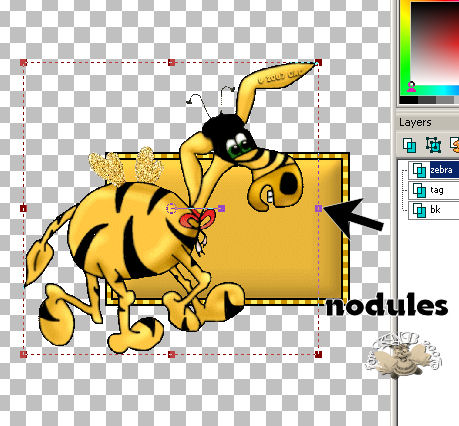

The center nodule will allow you to move your image around your canvas, the outer ones will allow you to move it in or out.
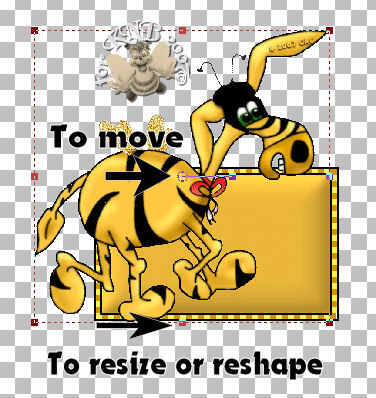


Lets give it a try, grab the center nodule and hold down your left mouse button and move that image around your canvas.  You will see how much flexibility you have.

Now that you have the basics of moving layers and then actually moving or resizing an image lets move the zebra to were we would like to see it on our tag.  I liked mine behind the blank yellow tag so I drug my zebra layer down once again below the tag layer in order to give it the appearance that the zebra was behind the blank tag.  Then using my "raster deform tool" I repositioned my zebra so that it was just above the tag giving the appearance that it was looking over it.  Mine looks like this:
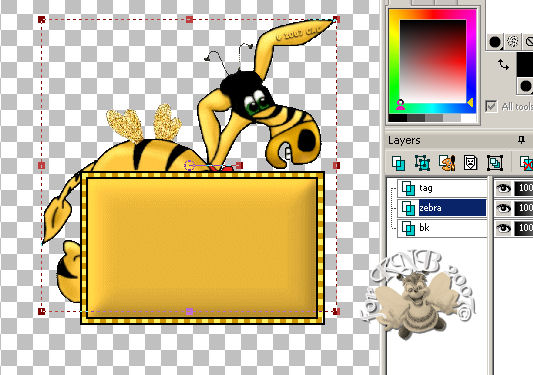
I'm pretty happy with mine so now I'm going to add my name to it.  When your happy with yours follow along and will do it together.
Activate your tag layer by clicking on it and making it blue, then on the left hand side of the page is the A button that's your text button click on that to activate that tool.


On the center of your blank tag just click and the text box will open up, from this point you can choose your font, size bold.  All the typical font stuff.  And if you notice we have a new layer.  Text will show as vectors when your working with them.
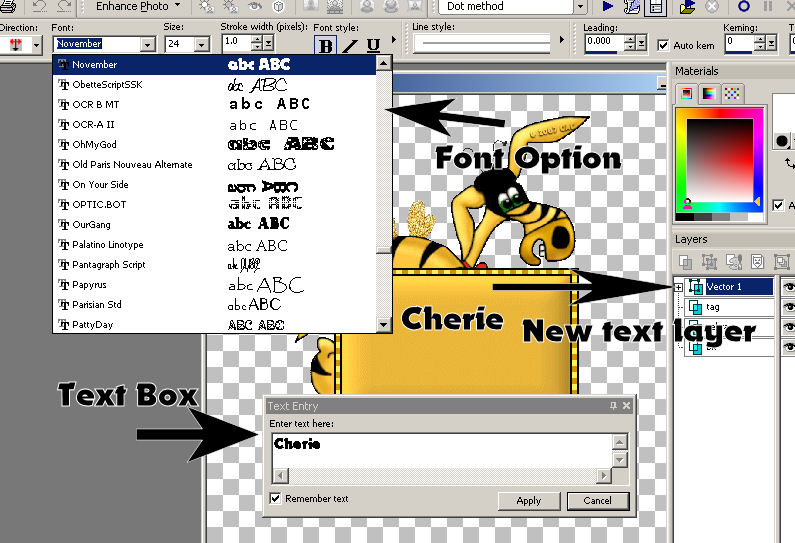
 

Lets add some color to our font.  Your Materials pallet is were you choose your colors for your font you should play around with it but remember if you don't like the color then there is always the redo button we learned above.
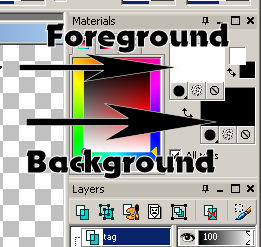


Okay add your name and will move on.  My name wasn't centered so I used my raster deform tool and centered my name.  Mine looks like this now:
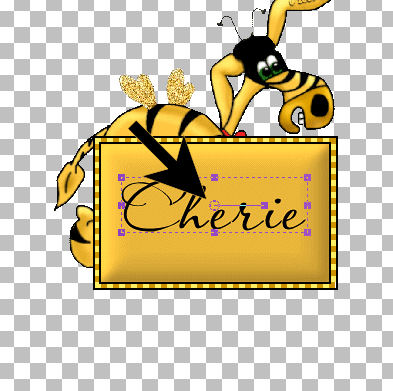


When your done you will notice that there is a vector 1 now in your layers, like above activate it and then right click on this time were going to "convert it to a raster layer" 


Then after its converted right click on it again and rename it "name".  my new layers look like this:  I had you do the renaming of this so you get use to the layers and the importance of renaming them.  I think you understand why you want to do this for every project.  There is nothing worse than wanting to redo something or do something else and you can't remember which layer it was you wanted to work on.
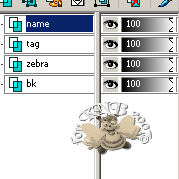
Okay the last step.  We need to finish it and save it.  If you do not merge everything together then you will only be saving whatever is still activated.  Example if I was to save mine right now then I would only save the name and nothing else.  So with that said lets merge it all together.  Right click on your "name layer" and click on Merge and then Merge Visible.  Were merging it visible because this tag has no background to it and we want to save it transparent.

Now all your layers have merged into one layer called "Merge"


Assignment:

Make 1 following along with the lesson

Then make another one using your own supplies.


Send to instructor and the group.


Please do not copy, tear apart, email or share these lessons without my permission: Thank You for your understanding and respect for the hard work that goes into these lessons.


Graphics/Content © 2006 Queen Krissy New-Bee's. All Rights Reserved.